New Features:
This section discusses a series of new features that have been added to
ARRIS++ that do not exist in the standard ARRIS distribution.
C-PEN System:
A comprehensive system for managing pen/color mapping has been added
to ARRIS++. This facility allows pens 0 through 15 and
pen none to be mapped to specific colors. This mapping may then
be saved as a style for later recall. Using the :cj_cpen command,
selecting a pen will then automatically set the associated color.
The :cj_cpen command is not assigned to any menu button by default,
but for those who wish to use this command, one possibility is to assign
it as a customized right-click option for the
two PEN and two COL boxes on the _BOTTOM menu. A
left-click on these boxes will still accesses the normal pen and color
functions while a right-click provides immediate access to the default
user cj_cpen style.
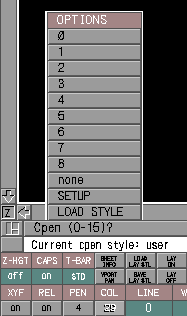
Standard :cj_cpen prompt
To review existing cpen styles or create new ones, select the SETUP
option from the standard prompt. This will display the C-PEN SETUP
menu.
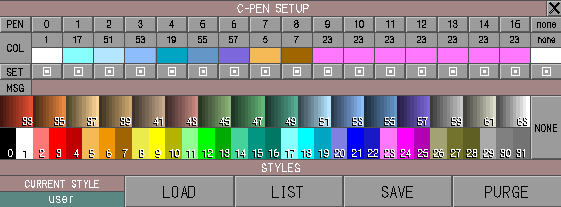
C-PEN SETUP Menu
(Click on image for pop-up window showing menu supporting 256 colors)
To create a new style, select a pen from the top row of the menu and
then select the color from the color bar that is to be associated with
that pen. When an entire set of pen/color assignments have been made,
select SAVE and enter a name for the style. Any number of styles
may be saved and then quickly recalled for special purposes. Note that
if a special style named user is created, it will be automatically
loaded the first time :cj_cpen is used during an ARRIS++ session.
For additional information see the
Cpen Manual Page.
If the optional cj_mnopt.sm sigmac
library is loaded, a series of abbreviated mnemonic commands (:cp0,
:cp1, :cp2, ... :cp15 and :cpn) are also
provided to quickly change to a new pen/color.
For easy placement on the toolbar, the C-PEN command can be
found in the Toolbar Command Database
under the ARRIS++: CUSTOM group.
Macro Tools: (Or Sigmac Programming for the Common Man!)
ARRIS has a simplistic utility called $ctrc() which can be used
to capture keyboard and mouse events and record them to a file on disk.
These stored operations can then be later recalled and executed using
$flin().
This feature can be very useful in certain circumstances. For example,
if you found yourself performing a series of uniformly repeating tasks,
it would be really convenient to be able to record those actions and
then execute them at any time with the push of a button. In ARRIS++,
a number of new sigmac commands were developed to make this not only
possible, but extremely easy.
| NEW COMMAND |
DESCRIPTION |
:cj_ma_edit |
Edit the contents of the specified macro file |
:cj_ma_mkdir |
Check for and/or create the usr:macros.dir
directory |
:cj_ma_play |
Execute the commands in the specified macro file |
:cj_ma_record |
Record to a macro file. If that file exists,
prompt before overwriting its contents |
:cj_ma_records |
Record to a macro file. If that file exists,
silently overwrite its contents |
:cj_ma_save |
Save a temporary macro to a new file with a more
permanent name |
:cj_ma_tmpbak |
Backup (rotate) the three temporary macro files
tmp1, tmp2 and tmp3 |
All macro files are automatically assigned a .mac suffix and are
stored by default in the macros.dir directory located under
$GRUSR. To make these tools easy to use there are a few
temporary filenames which are used by these command. These are:
tmp0, tmp1, tmp2 and tmp3.
It would be inconvenient to have to type these commands from the keyboard,
so a set of customized toolbar buttons have been created and included in
the TOOLBAR command database for immediate
use.
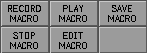
Here is a suggestion to get you started. Place the following four buttons
on your toolbar and try them out.

Sample Macro Buttons
These buttons use the one-shot tmp0 file, so every time
a recording session is started the previous macro will be lost, but they
are the easiest macro commands to use and therefore a good way to test
the waters.
Hint:
- To save valuable space on the toolbar, consider placing the two
bottom button on the background toolbar behind the upper two
buttons. You can then stop a recording session by right-clicking
on the the MACRO RECORD button and edit the macro by
right-clicking on the MACRO PLAY button!
As you get more comfortable working with macros, you may wish to switch
to the following buttons:

Sample Macro Buttons
These commands use the tmp1 macro storage file and automatically
save the last three macros in tmp1, tmp2 and tmp3.
This provides more flexibility while trying out macros since you can
quickly run a test or two without having lost the original macro you
started with.
For maximum flexibility consider using some or all of the following:
Sample Macro Buttons
These commands allow macros to be stored under any name. The increased
flexibility comes at the price of having to answer an additional prompt
each time the commands are used. A little experimentation with each of
these commands will help you decide which ones are right for you.
Example:
To make things clearer, let's consider a real-world example where
using a macro would be a significant time-saver.
Assume that you are working on the drawing that makes heavy use of
line type 2, drawn in pen #3 and color #19, and realize that you are
constantly setting these parameters on the edit menu so that you can
delete these specific lines using an AREA-IN fence. When you encounter
a repeating task like this you should immediately think of using a
macro. Here are the steps to take:
- Select MACRO RECORD on the toolbar to start a macro session

- * Click on the EDIT button to display the EDIT
menu
* Click on the LINES entity filter
* Click on the AREA IN search method
* Click on the LINE TYPE property and enter 2 from the keyboard
* Click on the PEN filter and enter 3 from the keyboard
* Click on the COLOR filter and enter 19 from the keyboard
* Click on the DELETE edit action
- Select MACRO STOP on the toolbar to end the macro session
That's it! Now, every time you need to delete lines of this particular
type, simply select MACRO PLAY from the toolbar and all of this
setup work will be automatically performed and you will be prompted
to begin defining the fence area for the line deletion.
Menu Explorer:
For those individuals interested in creating their own menus, it is often
necessary to determine how existing menus are constructed. A new tool
has been added to ARRIS++ which allows the existing menu system to be
easily explored.
When the new command, :menu, is executed, it prompts:
			Position cursor on the desired menu box and hit
			<CR>   (e: exit):
As prompted, place the cursor over any active menu box and press the
return key. The MENU PARAMETERS menu will be displayed:
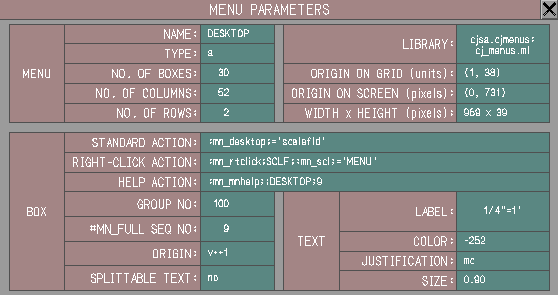
The MENU PARAMETERS pop-up menu
This menu displays a detailed set of information. The top section
describes the parameters of the target menu itself while the lower
section describes the particular menu box selected.
The command repeats, allowing additional menu boxes to be examined. The
mouse may be used to load different menus without terminating the command.
When finished, type an "e" to exit the routine.
Prompt Arguments:
- A number of existing commands were modified to remember a set of
previous input values and present these as prompt options when the
command is executed. Checks are performed to insure that duplicate
values are excluded. In addition, changes were made to improve
prompt messages, user input and error handling.
This following image shows an example of prompting for a new repeated
item (RI) name.
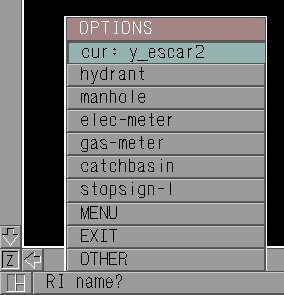
Prompt for new RI Name
As can be seen, in addition to the current RI, the previous six names
are available for immediate selection, saving the time of having to
retype the name or search for the entity on the SELECT menu.
- The following commands have been modified to offer this feature:
| COMMAND |
DESCRIPTION |
:mn__rim
|
Remember current RI name plus previous 6 names
|
:mn_chamfer
|
Remember two current chamfer distances plus previous 6 values
|
:mn_fillet
|
Remember current fillet radius plus previous 6 values
|
:mn_offset
|
Remember current offset distance plus previous 6 values
|
:mn_penmap
|
Remember current penmap style plus previous 6 styles
|
:mn_plotmen
|
Remember current penmap style plus previous 6 styles
|
:mn_ridraw
|
Remember current RI name plus previous 6 names
|
:mn_rin
|
Remember current RI name plus previous 6 names
|
:mn_riselect
|
Remember current RI name plus previous 6 names
|
:mn_sfload
|
Remembers the current as well as previous LINE,
RI and SOLID FILL pattern styles
|
:mn_sfsave
|
Remembers the current as well as previous LINE,
RI and SOLID FILL pattern styles
|
:mn_trimex
|
Remembers the previous 6 trim/extend distances
|
:mn_vpstat
|
Remember current penmap style plus previous 6 styles
|
Stop Command:
Other Tools:
Many other new tools have been added to the
ARRIS++ TOOLS menu. Click on the image below to go to that
section of the manual for a complete description.
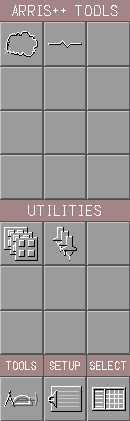
ARRIS++ TOOLS Overwrite Menu
See Also: