|
MAIN MENUS:
|
Main Menu Modifications

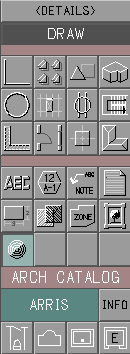
DRAW Main Menu
|
|
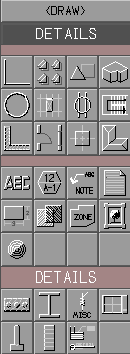
DETAILS Main Menu
|
|
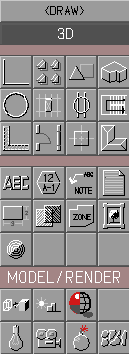
3D Main Menu
|
|
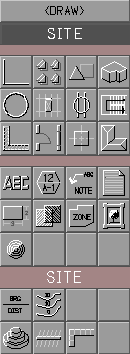
SITE Main Menu
|
Each of the revised main menus seen above has been redesigned to
provide four additional buttons which can be used to launch new
tools within ARRIS. This was accomplished by replacing the
GEOMETRY and NOTATION section labels with thin separators and
reducing the size of the application labels. All previously
existing buttons remain in their original locations.
Three of the new boxes are reserved for future use while the forth
has been assigned to the new POINTS application sub-menu
which is discussed in detain below.
|
|
DIMENSION:
|
Manual Leader Line Dimensioning

Manual Leader Line Button
As the button image indicates, the dimension leader line once had
the ability to have a dimension or text string associated with it.
This feature was removed from ARRIS many years ago, but
fortunately, it has now been restored. When this feature is
activated, the command will ask for the three points that define
the leader line and then will prompt:
Dimension text? def: NONE
-MEASURE- OTHER
At this point, any alpha-numeric text string to associate with the
leader may be entered, or by simply pressing <CR> the
leader line will be placed with no accompanying text. If
-MEASURE- is selected, then the command will prompt:
First measure point:
F5:select line,
<CR>:enter distance
Here, any two points on the drawing may be selected and the
measured distance between them will be included with the leader.
Additionally, if the mouse is positioned near an existing line on
the drawing and F5 is pressed, the length of that line will
be measured and included. If <CR> is entered, the
prompt will change to:
and a value will be read from the keyboard and treated as a numeric
distance for inclusion with the leader line.
The command then repeats.
This restored functionality is controlled by an option which is
set on the ARRIS++ OPTIONS
menu. For backwards compatibility, if this option is set to
NO, then the leader will continue to function as a simple
pointer. Setting the option to YES will activate all of
the measurement capabilities described above.
See the OPTIONS section below for more information.
|
Manual Dimensioning
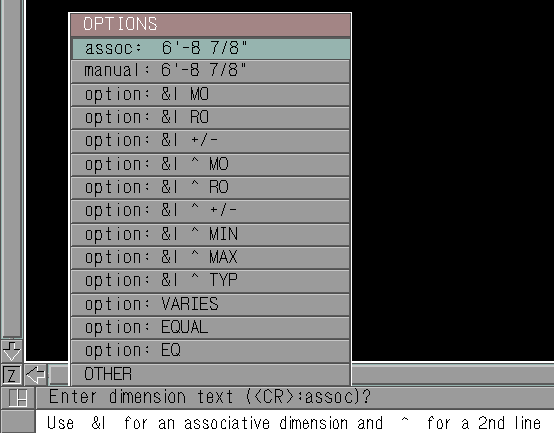
Manual Dimensioning Prompt
A significant improvement has been made to the prompting capability
for manual dimensioning. Previous, the enhancements provided by
Steve Garman were built into the command and could not be changed.
This limitation has now been lifted and the manual prompt options
are now table-driven, allowing a firm to specify a set of office
standards, or any individual user to set personal preferences for
dimensioning.
Manual dimension mode is selected when the TX MODE button
on the status menu is set to manual. When placing
dimensions in this mode, the default prompt now appear as shown
above. If <CR> is entered or the default
assoc: option is selected, the current dimension string
will be made associative. If the manual: option is
selected, then the distance shown will be entered as fixed text
and the dimension string will not be associative. If any
of the subsequent option: choices are selected, the
specified value will be used.
In addition, any other desired dimension text or string may
be entered from the keyboard (and the current
CAPS mode will be honored).
As the message line indicates, If &l (ampersand-ell) appears
in the string, it will be replaced by an associative dimension
value. Also, a ^ (caret) may be used to indicate that the
trailing information is to appear on a second line below the
preceding text.
The assoc: and manual: prompt options are always
presented, but the remaining option: strings may be
customized as can be seen in the following example:

Customized Dimensioning Prompt
To customize a set of prompts, first copy the default prompt
file located at $ARRIS/ap/cjsa.vn/cjmenus.ap/cj_mandim.tx
and place it in either STD:config.dir/cj_mandim.tx for
office-wide modifications or in USR:config.dir/cj_mandim.tx
for individual changes. Next, edit the file and follow the
instructions included there. Up to twelve different prompts may
be specified (anything over twelve will be ignored). Once the
modified file has been saved ARRIS will begin using the new
customized prompts.
Here is the cj_mandim.tx file that produced the customized
prompt seen above:
#---------------------------------------------------------------------------
# ARRIS++ MANUAL DIMENSIONING OPTIONS
#---------------------------------------------------------------------------
# FORMAT: upper_dim_string[^lower_dim_string]
#
# NOTES: * Comment lines begin with '#' and are ignored
# * There can be up to 12 option lines specified here
# * Use '&l' to indicate location for associative dimension string
# * Only one '&l' is allowed per option line
# * Use '^' to indicate the start of text below the dimension line
# * Don't use '^' or ';' in either the upper or lower strings
#---------------------------------------------------------------------------
&l +/-
EQ
&l^SLAB LENGTH
&l^PIECE LENGTH
&l^FIELD VERIFY
&l^EXACT
|
Note that when searching for the cj_mandim.tx file, the
user's config.dir is examined first. If the file is not
found in that location, then the standards directory is checked.
If no customization file is found, then the built-in default
prompts will be used.
|
|
OPTIONS:
|
ARRIS++ Options Menu
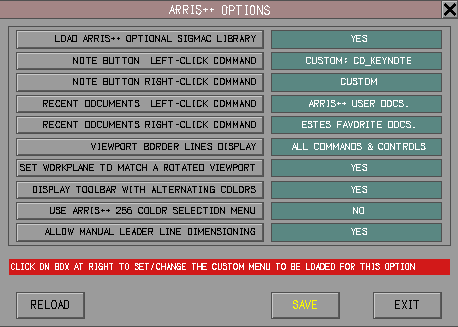
ARRIS++ OPTIONS Menu
A new option was added to control the behavior of the manual
leader line located on the DIMENSIONS overwrite menu.

Leader Line Dimensioning Option
If this option is set to NO, then the manual leader line
to operate as it has in recent versions of ARRIS, acting as a
simple pointer. However, setting this option to YES
reactivates the old original behavior of allowing text, dimensions
or dimensioned measurements to be associated with the leader line.
For more information, see the DIMENSION section above.
|
|
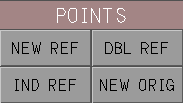
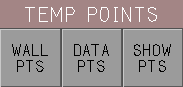
POINTS:
|
Points Toolkit

|
|
ARRIS++ adds a new POINTS toolkit which provides a set of
utilities used to manage and manipulate points (also known
as symbols) within ARRIS. A new button under the
NOTATION section of each of the application
Main Menus provides access
to the POINTS overwrite menu. As usual,
right-clicking on the button displays the POINTS
main flyout menu.
If the ARRIS++ Optional Sigmac
Library is loaded, the mnemonic command :pt may
also be used to load the POINTS overwrite menu.
|
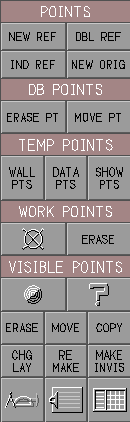
POINTS Overwrite Menu
|
|
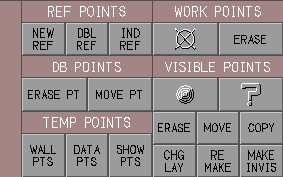
POINTS Main Flyout Menu
|
|
|

|
|
|

POINTS Status Menus
|
Standard Point Symbols:
|
|
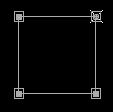
All entities within ARRIS have points associated with
their standard graphical display. Typically, these
points are invisible (i.e., are symbol number 0) and
there is no need for the user to be concerned with
them. However, ARRIS occasionally gets into an
improper state where these points begin to be displayed
as visible symbols as can be seen in the image of the
rectangle to the left.
Should the need arise, a section of the POINTS
status menu is devoted to managing these standard point
symbols.
|
To avoid being distracted by unnecessary information, the left
side of the POINTS status menu usually appear as follows:

STANDARD POINT SYMBOL Partial Status Menu (Hidden)
However, clicking on the SHOW PARAMETERS button causes
that section of the menu to display the point symbol parameters.

STANDARD POINT SYMBOL Partial Status Menu (Displayed)
The default parameters for typical invisible points are shown
here. If a non-standard parameter value is set, it will be
displayed on a bright red background to warn of this condition,
as seen for the rotation parameter in the following image.
If you really know what you are doing, it is possible to change
any of these standard point symbol parameters by clicking on the
appropriate box. For example, selecting the SYMBOL box
results in the following prompt:

Changing Standard Point Symbol
Note the warning message accompanying the prompt. This is a
reminder that this is an unusual operation and should be
performed with care.
The typical use for this menu is to check and reset the point
symbol parameters back to their default setting should they
somehow be changed. Each parameter can be reset to its default
value by right-clicking on the desired box while all of
the parameters can be immediately reset in one step by
selecting the RESET button.
The point symbol parameters will continue to be displayed until
the HIDE button is selected, returning this portion of
the status menu back to its original display mode.
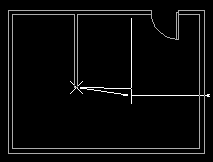
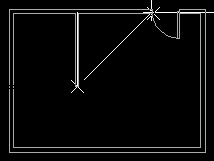
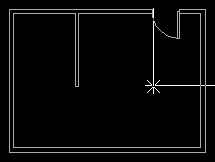
Reference Points:
Database Points:
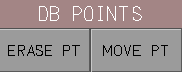
DATABASE POINTS Partial Overwrite Menu
This section of the overwrite menu contains functions for
managing database points. This includes visible points as
well as the standard invisible points associated with entities.
|
BUTTON
|
SELECT
|
DESCRIPTION
|
MNEMONIC CMD *
|
|
ERASE PT:
|
STD
|
Selecting this button allows individual points of any
type (both visible and invisible) to be erased.
Entities that are defined by these points will also be
erased. The command repeats.
Mnemonic: Think "Erase Point"
|
:ep
|
|
RC
|
Right-clicking on this button allows all points within a
fenced area to be deleted. The command repeats.
Mnemonic: Think "Erase Point Area"
|
:epa
|
|
MOVE PT:
|
STD
|
Selecting this button allows individual points of any
type (both visible and invisible) to be moved. Entities
associated with these points will be stretched. The
command repeats.
Mnemonic: Think "Move Point"
|
:mp
|
|
RC
|
Right-clicking on this button allows all points within a
fenced area to be moved. Command repeats.
Mnemonic: Think "Move Point Area"
|
:mpa
|
* The ARRIS++ Optional Sigmac
Library must be loaded to be able to use these mnemonic
commands.
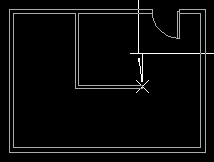
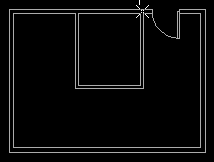
Temporary Points:
Work Points:
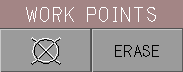
WORK POINTS Partial Overwrite Menu
This section of the overwrite menu contains functions for
managing Work Points. These are special ARRIS++
non-plotting points that can be used for a variety of purposes.
For example, they can be used as construction aids, reference
markets or place-holders for other work. They are often used
to mark a permanent reference or double-reference point during
a complex drawing construction.
Since they are non-plotting, they may be left on the drawing if
desired or erased at a later time.
|
BUTTON
|
SELECT
|
DESCRIPTION
|
MNEMONIC CMD *
|

|
STD
|
Selecting this button allows individual Work
Points to be placed on the drawing. The command
repeats.
Mnemonic: Think "Work Point".
|
:wp
|
|
RC
|
None
|
None
|
|
ERASE:
|
STD
|
Selecting this button allows individual Work
Points to be deleted from the drawing. The
command repeats.
Note that this command will only delete Work
Points. All other points, both visible and
invisible, will be unaffected.
Mnemonic: Think "Work Point Delete".
|
:wpd
|
|
RC
|
Right-clicking on this button allows all Work
Points within a fenced area to be deleted. The
command repeats.
Mnemonic: Think "Work Point Delete Area".
|
:wpda
|
* The ARRIS++ Optional Sigmac
Library must be loaded to be able to use these mnemonic
commands.
Work Points always have the following characteristics:
|
Symbol No:
|
|
26
|
|
Scale:
|
|
3/32" (0.094")
|
|
Rotation:
|
|
180-degrees
|
|
Color:
|
|
1
|
|
Pen:
|
|
0
|
If any of these parameters is changed after placement, the
point will no longer be recognized as a Work Point.
Visible Points:
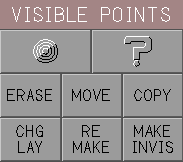
VISIBLE POINTS Partial Overwrite Menu
This section of the overwrite menu contains functions for
managing visible points.

|
|
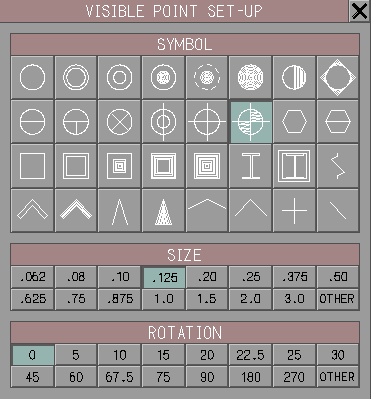
VISIBLE POINT SET-UP Menu
|
Clicking on the SET-UP button displays the VISIBLE POINT
SET-UP menu which allows the visible point parameters to
be selected. Choose a symbol, a size and a rotation value.
If the desired size and/or rotation is not displayed, select
the OTHER button and enter the desired value. The selected
parameters values will be displayed on the right side of the
status menu.

VISIBLE POINT Partial Status Menu
Individual parameters may also be changed by clicking on the
appropriate box on the status menu. Clicking on the symbol
icon or the VP SYMBOL box displays the VISIBLE POINT
SYMBOL pop-up menu which allows a new symbol to be
selected. Right-clicking on either box will immediately reset
to the default symbol number 11.
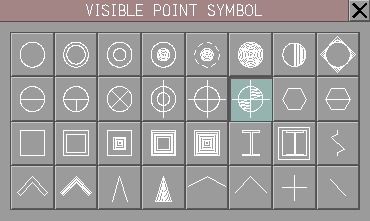
VISIBLE POINT SYMBOL Menu
Clicking on the VP SIZE box prompts for a new visible point
size. Right-clicking on this box immediately resets the
symbol size to the default value of 0.125" (3mm metric).
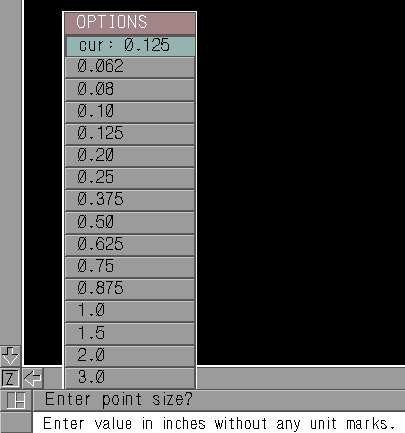
Visible Point Size Prompt
Clicking on the VP ROTATION box prompts for a new visible point
rotation. The angle entered will automatically be adjusted to
an equivalent value between 0 and 360 degrees. Right-clicking
on this box immediately resets the symbol rotation to the
default value of 0-degrees.

Visible Point Rotation Prompt
The commands on the overwrite menu perform the following
functions:
|
BUTTON
|
SELECT
|
DESCRIPTION
|
MNEMONIC CMD *
|

|
STD
|
Selecting this button allows a visible point to be
placed on the drawing based upon the current parameters
displayed on the status menu. The command repeats.
Mnemonic: Think "Insert Point".
|
:ip
|
|
RC
|
None
|
None
|

|
STD
|
Selecting this button allows a visible point to be
queried with the results displayed in the POINT
QUERY/EDIT pop-up menu. the command repeats.
Mnemonic: Think "Query Point".
|
:qp
|
|
RC
|
None
|
None
|
|
ERASE:
|
STD
|
Selecting this button allows an existing visible point
to be deleted from the drawing. Invisible points will
not be affected by this operation. The command
repeats.
Mnemonic: Think "Erase Point Visible".
|
:epv
|
|
RC
|
Right-clicking on this button allows all visible points
within a fenced area to be deleted in one operation.
The command repeats.
Mnemonic: Think "Erase Point Visible Area".
|
:epva
|
|
MOVE:
|
STD
|
Selecting this button allows an existing visible point
to be moved within the drawing. Invisible points will
not be affected by this operation. The command
repeats.
Mnemonic: Think "Move Point Visible".
|
:mpv
|
|
RC
|
Right-clicking on this button allows all visible points
within a fenced area to be moved in one operation. The
command repeats.
Mnemonic: Think "Move Point Visible Area".
|
:mpva
|
|
COPY:
|
STD
|
Selecting this button allows an existing visible point
to be copied within the drawing. Invisible points will
not be affected by this operation. The command repeats.
Mnemonic: Think "Copy Point Visible".
|
:cpv
|
|
RC
|
Right-clicking on this button allows all visible points
within a fenced area to be copied in one operation. The
command repeats.
Mnemonic: Think "Copy Point Visible Area".
|
:cpva
|
|
CHG LAY:
|
STD
|
Selecting this button allows an existing visible point
to be changed to a new layer. Invisible points will
not be affected by this operation. The command repeats.
|
None
|
|
RC
|
Right-clicking on this button allows all visible points
within a fenced area to be changed to a new layer in one
operation. The command repeats.
|
None
|
|
RE MAKE:
|
STD
|
Selecting this button allows an existing visible point
to be remade using all of the current visible point
parameters displayed on the status menu. Invisible
points will not be affected by this operation. The
command repeats.
|
None
|
|
RC
|
Right-clicking on this button allows all visible points
within a fenced area to be remade in one operation. The
command repeats.
|
None
|
|
MAKE INVIS:
|
STD
|
Selecting this button allows an existing visible point
to be made invisible. The point will be changed to
symbol number 0 with a size of 0.062" and a rotation
of 0-degrees. The command repeats.
This can be very useful for "fixing" errant
entity points that may have accidentally become
visible. (See Standard
Point Symbols above.)
|
None
|
|
RC
|
Right-clicking on this button allows all visible points
within a fenced area to be made invisible in one
operation. The command repeats.
|
None
|
* The ARRIS++ Optional Sigmac
Library must be loaded to be able to use these mnemonic
commands.
|
QUERY:
|
Query Distance
Query DISTANCE Menu
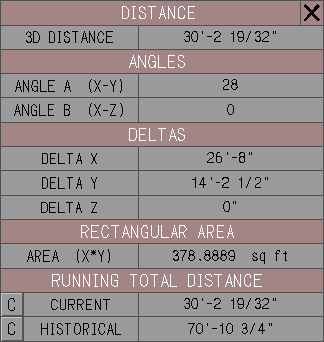
A new entry for AREA (X*Y) has been added to the DISTANCE
menu. This displays the rectangular area defined by the two input
points as projected onto the X-Y plane. In other words, any Z-axis
component is ignored for the purpose of this calculation. If the
two input points happen to fall along either the X or the Y-axis,
then there is no rectangular area to calculate and the message
<NO RECTANGULAR AREA> will be displayed to
indicate this fact.
|
|
RIs:
|
RI Status Menu

Partial RI Status Menu
The 2D/3D button was enhanced to update the display of the
RIs in the REPEATED ITEM SELECT menu if it is currently
displayed. Previously, the menu would simply be erased from the
screen. However, this means that existing RIs on the drawing will
not be updated if the display mode is changed while the
SELECT menu is on the screen. This can easily be addressed by
right-clicking on the 2D/3D box at any time to get the screen to
update.
|
Existing Sigmac Bug Fixes:
The following table lists fixes that have been applied to
existing sigmacs to correct problems
and bugs.
:mn_dxyabs
|
This command failed completely if the REL mode was on and the
current reference point was located anywhere other than at the
drawing origin. This problem has been corrected.
|
Existing Sigmac Enhancements:
The following table lists revisions that have been made to
existing sigmacs in order to provide
some expanded or new capability beyond that offered by the original
command.
:dpe
|
Added code to redisplay the database point 'X' markers if they
are turned on for display.
|
:dper
|
Added code to redisplay the database point 'X' markers if they
are turned on for display.
|
:mn_dim
|
Reactivated and improved code that allows freestanding dimension
leader lines to have manual text or measured dimension notation
added. This feature is controlled by a new ARRIS++ option so that
the original or new leader line behavior can be selected by the
user.
|
|
Improved command prompting to indicate the actions taken when
<CR> was entered. Also added prompts to indicate when
it was possible to use the previously undocumented F8 key
to automatically dimension door and window openings.
|
:mn_dim2
|
Improved the manual dimensioning mode by replacing the fixed
dimensioning options with a table-driven configuration that allows
a set of office standard or individual user prompt options to be
configured.
|
:mn_dist
|
Added code to support the new RECTANGULAR AREA box on the
DISTANCE menu.
|
:mn_dxyabs
|
Added an exit handler routine to insure that the user's original
REL mode is properly reset, regardless of how the command is
terminated.
|
|
Expanded the input prompt for clarity and modified it so that
<CR> can be used to terminate the command.
|
:mn_lyent
|
Added support to remake visible points.
|
:mn_pset
|
Added full support for all visible point parameters.
|
:mn_qry
|
Added full support for all visible point parameters.
|
:mn_ri2d3d
|
Command was enhanced to update the RIs displayed on the REPEATED
ITEM SELECT menu, if it is currently on the screen.
|
:mn_sample
|
Added support for the POINTS status menus
(CJ_PT_STAT0 and CJ_PT_STAT1) when the systemwide
color is changed.
|
:mn_sldarr
|
Added code to redisplay the database point 'X' markers if they
are turned on for display.
|
:mn_sldbar
|
Added code to redisplay the database point 'X' markers if they
are turned on for display.
|
:mn_sldcrn
|
Added code to redisplay the database point 'X' markers if they
are turned on for display.
|
:mn_view
|
Added code to redisplay the database point 'X' markers if they
are turned on for display.
|
:mn_zmidg
|
Added code to redisplay the database point 'X' markers if they
are turned on for display.
|
:mn_zmodg
|
Added code to redisplay the database point 'X' markers if they
are turned on for display.
|
|
:pan
|
Added code to display the viewport border outline if so indicated
by the user's option selection. For more information see
Viewport Outline
and
ARRIS++ Options.
|
|
Added code to redisplay the database point 'X' markers if they
are turned on for display.
|
:zmi
|
Added code to redisplay the database point 'X' markers if they
are turned on for display.
|
:zmo
|
Added code to redisplay the database point 'X' markers if they
are turned on for display.
|
New ARRIS++ Sigmacs:
Optional ARRIS++ Sigmacs:
The following new sigmac routines have been added to the optional
cj_mnopt.sm sigmac library
in this release of ARRIS++.
| CMD |
EQUIVALENT CMD |
CLASS |
BRIEF DESCRIPTION |
:cpv |
:cj_pt_copy;='single' |
point |
Copy individual visible point(s) |
:cpva |
:cj_pt_copy;='allin' |
point |
Copy visible points within a fenced area |
:dd |
:drp |
point |
Set a double-reference point |
:ddd |
:cj_pt_ddrp |
point |
Display (flash) the double-reference point |
:ep |
:cj_pt_eras;='single';='any' |
point |
Erase (delete) individual database point(s) |
:epa |
:cj_pt_eras;='allin';='any' |
point |
Erase (delete) all database points within a fenced
area |
:epv |
:cj_pt_eras;='single';='visible' |
point |
Erase (delete) individual visible point(s) |
:epva |
:cj_pt_eras;='allin';='visible' |
point |
Erase (delete) all visible points within a fenced
area |
:ip |
:cj_pt_addp;='normal' |
point |
Insert (add) individual visible point(s) |
:kk |
:cj_pt_ndrp |
point |
Set a new indirect reference point |
:kkk |
:cj_pt_dref;cj_pt_ddrp |
point |
Display (flash) the current reference and
double-reference points |
:mp |
:cj_pt_move;='single';='any' |
point |
Move individual database point(s) |
:mpa |
:cj_pt_move;='allin';='any' |
point |
Move all database points within a fenced area |
:mpv |
:cj_pt_move;='single';='visible' |
point |
Move individual visible point(s) |
:mpva |
:cj_pt_move;='allin';='visible' |
point |
Move all visible points within a fenced area |
:nn |
:nrf |
point |
Set a new reference point |
:nnn |
:cj_pt_dref |
point |
Display (flash) the current reference point |
:ooo |
:mn_dxyabs;0;0 |
point |
Display (flash) the current database origin point |
:oox |
:mn_dborigin |
point |
Set a new database origin point |
:pt |
:cj_pt_load |
point |
Load the POINTS overwrite menu |
:qp |
:mn_query;='point' |
point |
Query visible point(s) |
:sp |
:cj_pt_show |
point |
Toggle the ARRIS++ SHOW POINTS mode on/off |
:spd |
:cj_pt_dpts |
point |
Mark all database points with a temporary 'X' |
:spw |
:mn_wlpts;='all' |
point |
Mark all wall points and lines with temporary red
markers |
:wp |
:cj_pt_addp;='workpoint' |
point |
Place a Work Point on the drawing |
:wpd |
:cj_pt_wpds |
point |
Delete individual Work Point(s) |
:wpda |
:cj_pt_wpda |
point |
Delete all Work Points within a fenced area |
Note: The :rioff optional ARRIS++ mnemonic sigmac has been
eliminated as it is no longer applicable. The RI ORIGIN OFFSET
menu has been integrated into the repeated item status menu and no longer
requires a separate command to launch it.
|